macOS
macOS Permissions for Dialogica
Allow the macOS access Dialogica needs for voice, screen context, files, and notifications.
Category: macOS | Audience: Mac users | Suggested slug: macos-permissions-for-dialogica
Install first Make sure Dialogica is in the Applications folder and open it from there before granting permissions. This helps macOS associate each permission with the installed app.
Permissions Dialogica may request
Microphone - Used for voice interaction, dictation, and meeting features.
Screen & System Audio Recording - Used only by features that need screen context or system audio. On some macOS versions, this setting may be named Screen Recording.
Files and Folders - Allows Dialogica to work with files or protected folders you choose to use.
Notifications - Allows Dialogica to show reminders, approval requests, and other alerts.
Where to find each setting
Privacy permissions: Apple menu > System Settings > Privacy & Security, then choose Microphone, Screen & System Audio Recording, or Files and Folders.
Notifications: Apple menu > System Settings > Notifications > Dialogica.
Only enable what you use Dialogica may not request every permission immediately. macOS normally prompts when you first use a feature that needs that access.
Allow microphone access
Microphone access is required for voice interaction and meeting features.
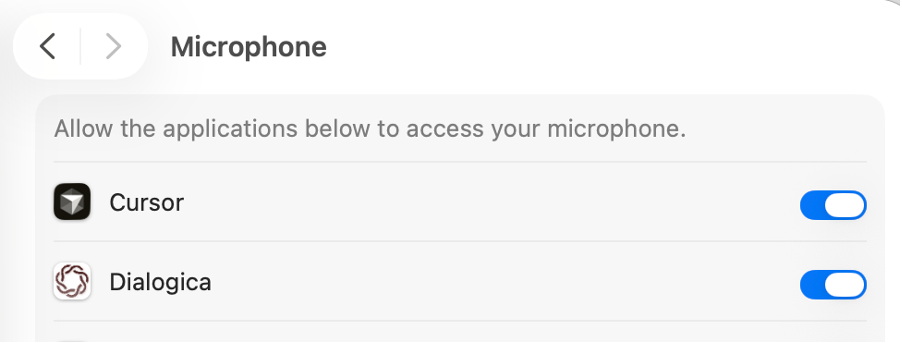
System Settings > Privacy & Security > Microphone: enable Dialogica.
Step 1 | Open Microphone settings Open System Settings, select Privacy & Security, and then select Microphone.
Step 2 | Enable Dialogica Locate Dialogica and turn on its access toggle.
Step 3 | Reopen the app If macOS offers Quit & Reopen, select it. Otherwise, quit Dialogica completely and open it again.
If Dialogica is not listed
Open Dialogica from the Applications folder and start a voice or meeting feature. When macOS displays the permission prompt, select Allow. Dialogica should then appear in the Microphone list.
If there is still no microphone input
Check the selected device: Open System Settings > Sound > Input and confirm the microphone you want to use is selected and responding.
Restart after changing access: Quit Dialogica with Command-Q, reopen it, and try the voice feature again.
Managed Mac: Your organization may restrict microphone permissions. Contact your IT administrator if the setting is locked or cannot be changed.
Allow screen and system audio access
Enable this permission when you use a Dialogica feature that needs screen context or system audio.
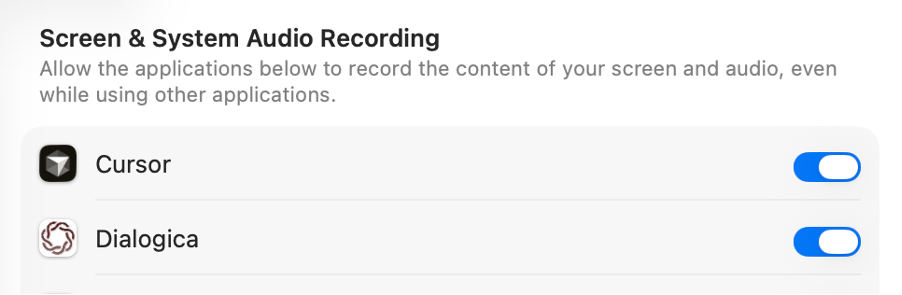
System Settings > Privacy & Security > Screen & System Audio Recording: enable Dialogica.
Step 1 | Open the recording setting In System Settings, select Privacy & Security, then Screen & System Audio Recording. On an older macOS version, select Screen Recording.
Step 2 | Enable Dialogica Turn on the Dialogica toggle and approve any confirmation message.
Step 3 | Quit and reopen Dialogica Screen-related permission changes usually require the app to restart before they take effect.
Files, folders, and notifications
Files and Folders: Open Privacy & Security > Files and Folders and enable the folders Dialogica needs. This entry may appear only after Dialogica requests access to a protected location.
Notifications: Open System Settings > Notifications > Dialogica, turn on Allow Notifications, and choose your preferred alert options.
Dialogica still is not recognizing a permission
Quit completely: Use Command-Q or choose Dialogica > Quit Dialogica, then reopen the app from Applications.
Trigger the request again: Return to the Dialogica feature that needs the permission and retry it.
Restart the Mac: If the toggle is enabled but the feature still cannot access it, restart macOS and try again.
Ask for help: If the setting is locked, missing, or continues to fail, contact your IT administrator or Dialogica Support. Include your macOS version, Dialogica version, and a screenshot that contains no confidential client information or work product.
Was this article helpful?
That’s Great!
Thank you for your feedback
Sorry! We couldn't be helpful
Thank you for your feedback
Feedback sent
We appreciate your effort and will try to fix the article